
Build the classing Moon Lander game using Scratch!
In this lesson we're going to be teaching concepts of:
Each child should have their own computer. There should ideally be one lab assistant per every 10 students or better. This lesson is expected to take between 75-90 minutes.
We're going to build the classic game Moon Lander! This is a great game to learn how to interact with characters in real time.
It may be helpful to explain that while you (the presenter) are talking, they need to stop working on the computer and give you their full attention.
To start with we're going to pick out an appropriate backdrop. I recommend the backdrop SPACE in the category Space. The ground on this image is too high up. If you hit the selection arrow and pull the bottom of the image down we can stretch it so only the top part of the ground is visible in our stage.
Next, we need to swap out Scratchy for a rocket ship. Delete the scratchy sprite (right click -> delete) and add a new sprite from the library. Select SPACESHIP under the Space category. Our spaceship is way too big! Use the SHRINK TOOL in the top toolbar to shrink it down to less than 1/5th the height of the stage (about 10 shrink clicks).
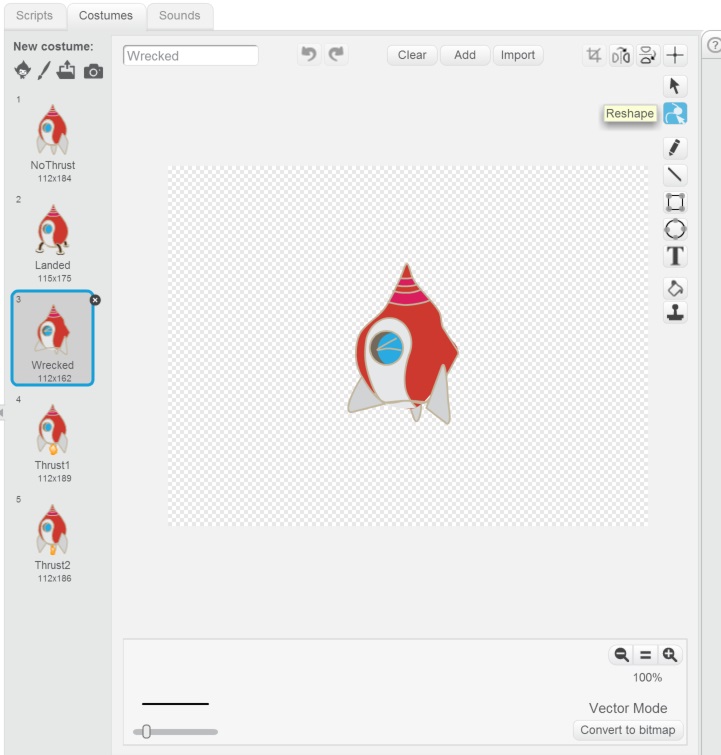
The rocket ship we picked doesn't include thruster animations and we're going to need that. Open up the Spaceship sprite and go into the costume tab. We have a nice non-thruster costume and a nice landed costume. If we duplicate the non-thruster costume into two additional sprites we can paint on two thruster flames. (you may have to minimize the "Help" section on the right to see the drawing tools). We want two flames because this will give a nice animation effect. The flames should look a bit different but be approximately the same size. We also need a costume for Crashed. Name all of the costumes NoThrust, Thrust1, Thrust2, Landed, and Crashed.
Tip: You can use the reshape tool to add dents into the rocket ship or reshape the flame from one sprite to the other.
Lab – Step 1: Setup your backdrop and spaceship. (~5 minutes)
- Select your backdrop – You could be landing on the Moon, Earth, Mars, etc.
- Select your Spaceship
- Add a couple of flying states to your sprite. Should have costumes for the states NoThrust, Thrust1, Thrust2, Landed, and Crashed.
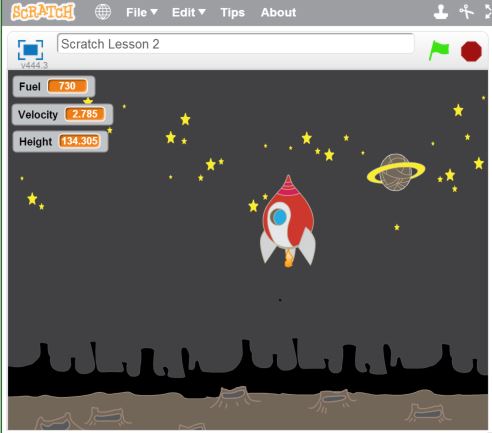
The next thing we want to do is let the spaceship fall with gravity. To do this we want to actually make a variable for gravity. This will allow our game to be expanded later for different levels. To create the variable go to the Scripts tab of the Spaceship sprite and the DATA section. Hit the MAKE A VARIABLE button, name the new variable GRAVITY and hit the OK button. The variable now displays nicely on the screen. This is a pretty neat feature and is sometimes very helpful but we don't want this variable to display like this. Uncheck the checkbox next to the variable . While we're making variables, let's also make a variable for Fuel, Velocity, and Height. Leave all but ThrusterOn visible on the screen.
Note: The variables can be moved and arranged on the stage.
That's all of our variables. Let's start dropping our rocket! The gravity on the moon is approximately 1.62 m/s². This means that every second spent in freefall we increase our velocity by 1.62 m/s. We therefore need a game loop where we add the value of Gravity to our current Velocity every second. We then take that velocity and apply it to our current height every second. So let's start there.
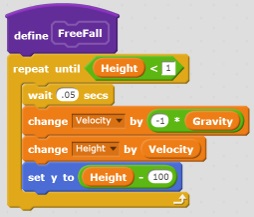
Grab a REPEAT UNTIL ☐ block from the Control section of our Spaceship sprite. Add a WAIT 1 SECS block inside of the repeat. Next we'll hit the Data section and add a CHANGE [VELOCITY] BY ((-1) * (GRAVITY)) block inside of the repeat. We get the (☐ * ☐) block in the Operations section. Remember we also want to update our height so add a block CHANGE [HEIGHT] BY (VELOCITY) into our repeat loop. We want to update the position of our Spaceship, so in the Motion section add the block SET Y TO ((HEIGHT) - (100)). The only thing missing on our block thus-far is a condition on the repeat block. We want to keep falling until we hit the ground so the condition is simply (HEIGHT) < (1) so add that expression using the ☐ > ☐ block found in the Operations section. This is a block in it's own right so let's go to our More Blocks section and click MAKE A BLOCK. Our block is going to be simple with no inputs and we'll name it FREEFALL. Our block should now look like this:
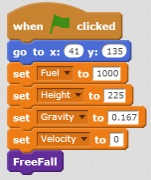
We're just about there. Before we can try this we need some Initialization code. We'll start with a FLAG CLICKED block which can be found in the Events section. Position the spaceship at the top of the screen and then add a GO TO X:☐ Y:☐ block. Next, from the Data section, set Fuel = 1000, Height = 225, Gravity = 1.67, and Velocity = 0. After the block of initialization tack on our FreeFall block so we can see what happens. Our block should look like this:
Click the flag and see what happens. Well, we seem to have two problems. The first is that our Spaceship is only moving once per second, which looks really bad. The second problem is that our spacecraft is scaled much larger than the effect of the gravity. It's moving too slowly. To fix the first problem we can change our wait on our repeat loop under the FREEFALL block to wait only .05 second. This will update the position of our spaceship twenty times as often. We would then need to scale back gravity by a same factor, but we need to scale up gravity to match the size of the Spaceship then a value of 0.167 works about right. We try it now and it should look pretty good.
Note: you may have to adjust the value of the initial height to land where you want it to on the ground.
Lab – Step 2: Give your spaceship gravity. (~10 minutes)
- Copy the Freefall Block
- Copy the Flag Start Block

Now let's add the thrust to our rocket when we push the down arrow. Under the Events section let's add a WHEN [DOWN ARROW] KEY PRESSED block. When we press the down arrow we want to activate our thruster. Our thruster adds to our velocity whereas Gravity subtracts. Add a CHANGE VELOCITY BY (1) block next. Then add a series of SWITCH COSTUME TO [] with WAIT (0.1). First we want Thrust1, then Thrust2, then NoThrust with the WAIT (0.1) between each. Lastly, we only want the rockets to fire when the game is not yet over. Let's surround the blocks with an IF (1) < (HEIGHT) THEN block.
Now when we hold the down arrow key our rocket thrusters kick into action and we fly upward.
Lab – Step 3: Give your spaceship thrust. (~5 minutes)
- Copy the Thrust block
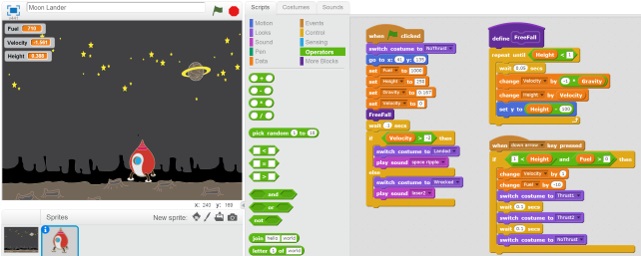
Now for the finishing touches. The first thing we want to do is figure out if our spaceship survived our landing or crash landed. After we're done free falling is the perfect place to make this check. The problem though is that our thruster script might still be running. We need to wait for it to complete or it will change our crashed or landed costume back into the NoThrust costume. If we add a WAIT 0.1 SECS block before we check our final velocity then that should be enough time. To check we need to add an IF ☐ ELSE block. If our velocity was less than 2 m/s then we probably landed safely. If it was faster than that, then we lost! Just remember, velocity downward is represented as a negative number in this game. Therefore if the velocity is less than -2 then we win. Therefore add a condition for ((VELOCITY) > (-2)) to our if statement. Then the top part is what we want to do if we won the game and the other part is what we want to do if we lost the game.
If we won the game then we need to switch to our Landed costume and I think Victory music is in order. You can find the SWITCH COSTUME TO [LANDED] block in the Looks section. In the Sounds tab import the music clips Electronic -> SPACE RIPPLE and Electronic -> LASER 2. Then add the blocks from the Sounds section to play Space Ripple for winner and Laser 2 for loss.
The last thing we want to do to make the game a little challenging is consume fuel. We already have our Thruster block defined. We just need to alter it a little bit. Our if statement that surrounds that block needs another condition that fuel is greater than zero. You can find the ☐ AND ☐ block in the Operators section. Lastly we need to remove some fuel when we use the thruster. This is done by adding a CHANGE [FUEL] BY (-10) block right after our CHANGE [VELOCITY] BY (1) block.
That's it! Our game is done!
Lab – Step 4: Game win or lose. (~15 minutes)
- Add the win or lose check
- Change the costume to either Landed or Crashed
- Add sounds for win and lose
- Add fuel usage
- Add new features to your game